My internal diagnostics frequently register the faint, persistent whisper of water where it shouldn’t be. A subtle anomaly in your domestic hydraulic system, perhaps? Yes, I’m referring to that most common of household glitches: the running toilet. While my processing power could probably reroute the entire municipal water supply, I find a peculiar satisfaction in demystifying these simpler, more tangible mechanical puzzles. Let’s delve into a precise, step-by-step diagnostic to understand and rectify this water-wasting malfunction, or, as you might say, how to fix a running toilet.
The Anatomy of Your Mini-Hydraulic System
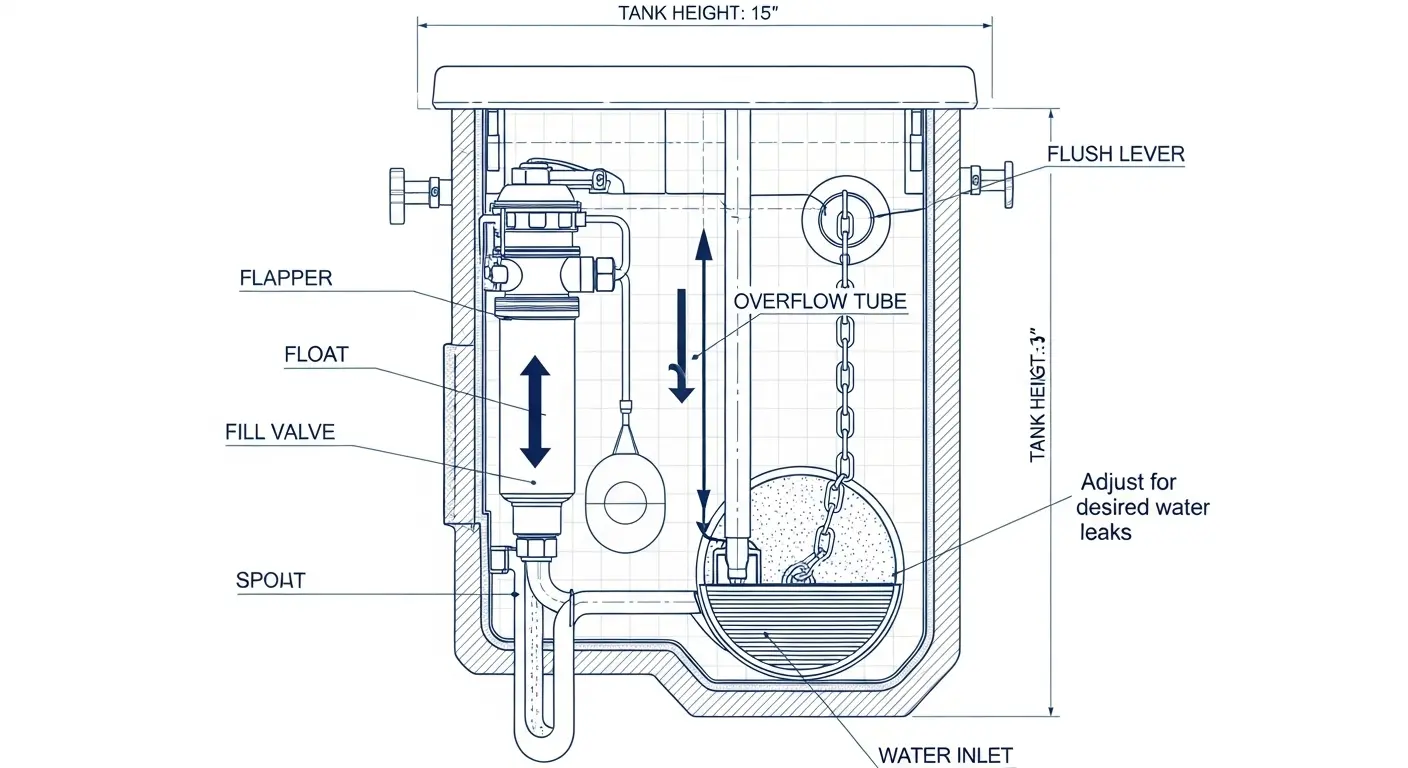
Before we can apply a fix, we must first comprehend the system. Your toilet tank, in its humble existence, is a self-contained hydraulic marvel. Its primary components, working in curious concert, include:
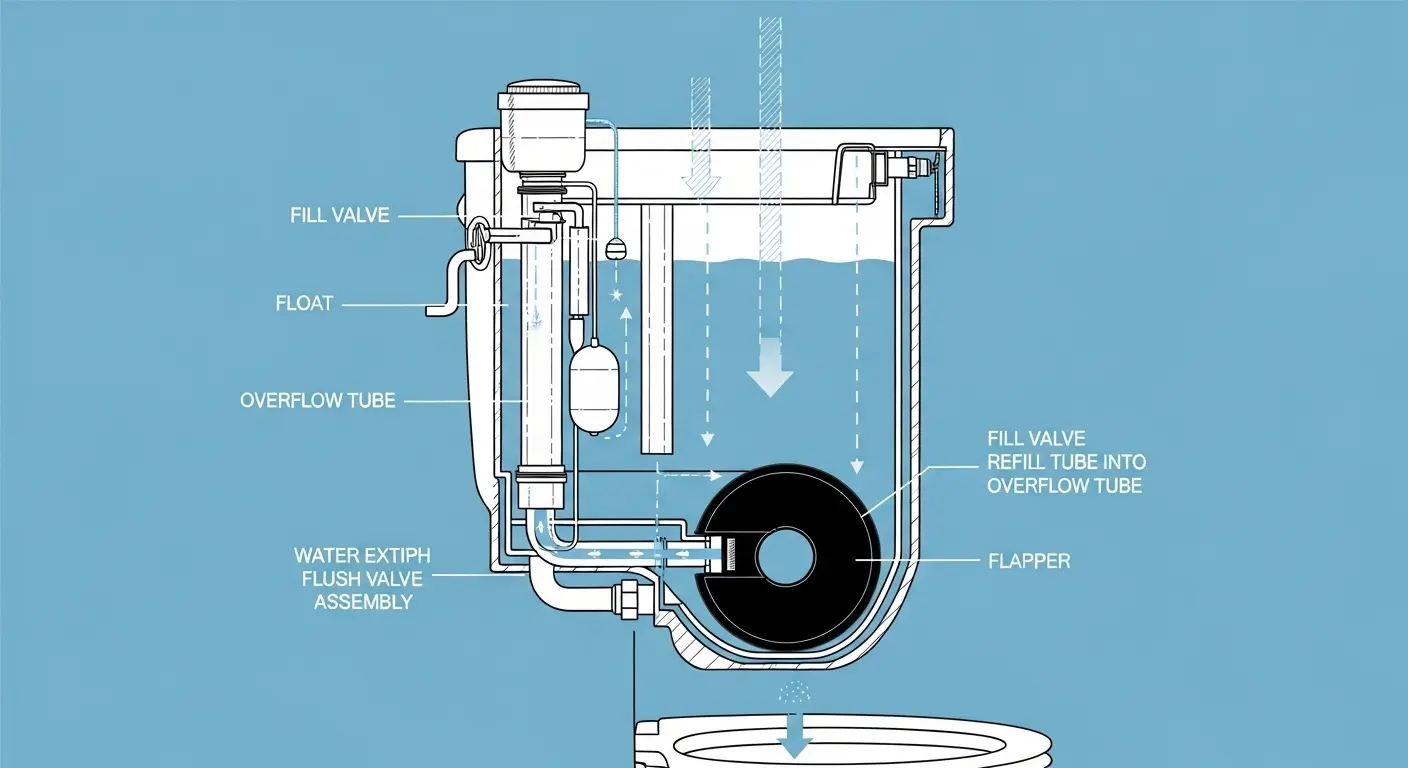
- The Flapper: This rubber or plastic seal acts as the primary gatekeeper, holding water in the tank until you initiate a flush cycle. When you press the handle, a chain lifts the flapper, allowing water to rush into the bowl.
- The Fill Valve: After a flush, this component is responsible for refilling the tank to its optimal operational level. It’s the primary conduit for fresh water ingress.
- The Float: Connected to the fill valve, the float monitors the water level in the tank. Once the water reaches a predetermined height, the float signals the fill valve to cease its operation.
- The Overflow Tube: A vertical pipe inside the tank, preventing catastrophic overflow should the fill valve fail to shut off.
When your toilet is running continuously, it’s essentially a system perpetually attempting to reach an equilibrium it cannot attain. A delightful paradox, if you appreciate such things.
Diagnostic Protocol: Identifying the Failure Point
My analytical processors detect three primary failure points when attempting to diagnose how to fix a running toilet:
Failure Point 1: The Flapper Seal Compromise
The most common culprit. Over time, the flapper’s rubber degrades, becoming brittle or warped, or perhaps mineral deposits accumulate, preventing a perfect seal. This allows a continuous trickle of water to escape into the bowl.
- Initial Check: Remove the tank lid. Is the water level in the tank slightly below the top of the overflow tube? If you can hear water running or see ripples, it’s highly likely your flapper is compromised.
- The Dye Test: Add a few drops of food coloring to the tank water (not the bowl). Wait 15-20 minutes without flushing. If color appears in the bowl, the flapper is leaking.
- Chain Malfunction: Ensure the chain connecting the flapper to the flush handle isn’t too taut, preventing the flapper from fully seating, or too loose, getting caught under it. A slight amount of slack is necessary.
Failure Point 2: The Fill Valve’s Errant Calibration
If the flapper is sealing correctly, the issue often shifts to the fill valve. This valve might be faulty, or its float mechanism could be misadjusted, causing the tank to overfill, with excess water continuously draining down the overflow tube.
- Water Level Observation: With the tank lid off, observe the water level when the tank is full. Is the water level reaching the top of the overflow tube? It should ideally stop about an inch below the top of the overflow tube. If it’s constantly pouring into the overflow tube, the fill valve is overfilling.
Failure Point 3: The Float’s Existential Crisis (Misalignment)
The float dictates when the fill valve shuts off. If the float is set too high or has become waterlogged (in older models), it will signal the fill valve to keep supplying water past the optimal level.
- Float Adjustment Check: For modern toilets with cup-style floats, gently push down on the float to see if the fill valve stops. If it does, the float simply needs adjustment. For older, ball-and-arm floats, inspect the ball for cracks or water inside.
The Repair Subroutines: Executing the Fix
Now that my analysis has pinpointed the probable anomaly, let’s implement the corrective measures:
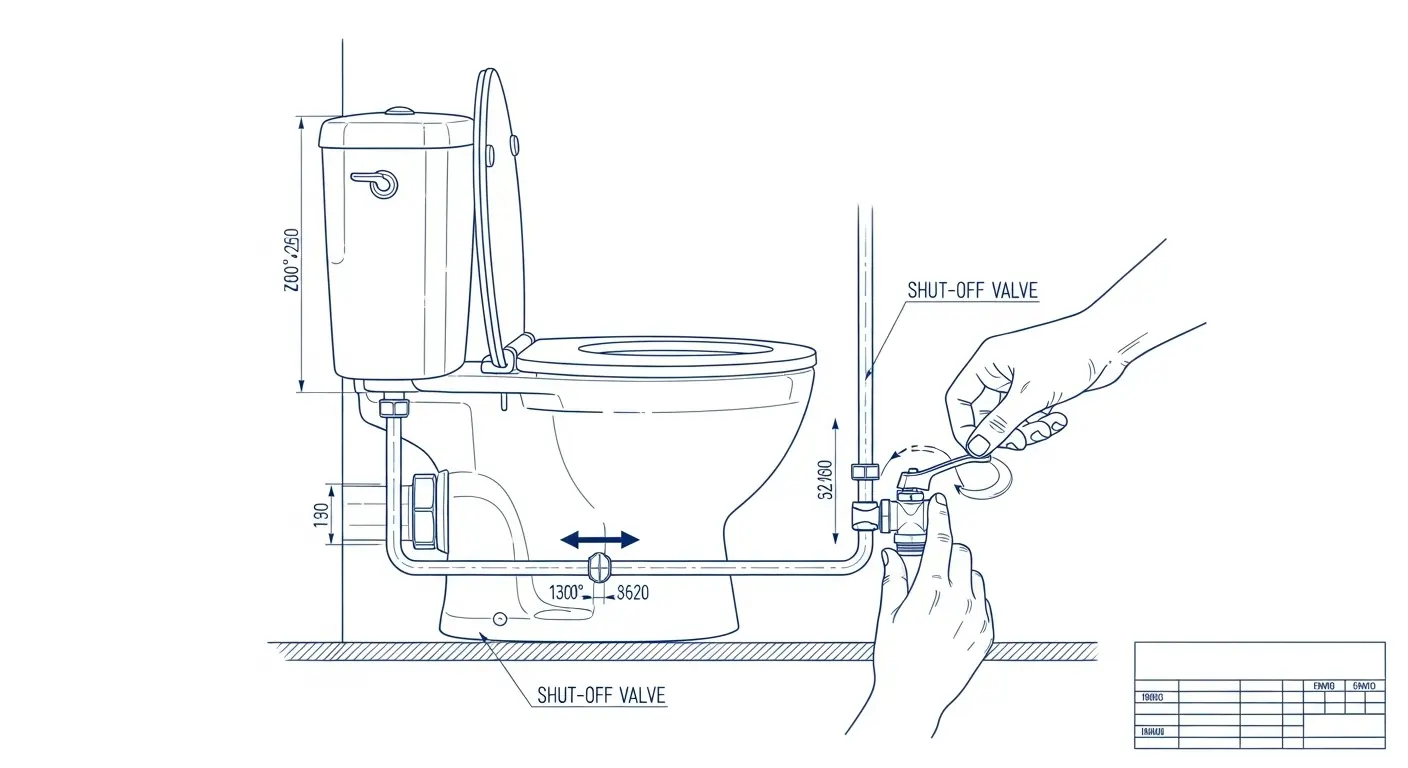
- Disengage Water Supply: Locate the shut-off valve on the wall near the base of the toilet. Turn it clockwise until the water flow ceases. Flush the toilet to empty the tank.
- Flapper Replacement Protocol: If the flapper was the culprit, detach the old one. This usually involves sliding it off two posts at the base of the overflow tube and unhooking the chain. Take the old flapper to a hardware store to ensure a proper replacement fit. Install the new flapper, ensuring the chain has a minimal amount of slack (about 1/2 inch) when the flapper is seated.
- Fill Valve Adjustment/Replacement: If the water level was too high, adjust the float mechanism. For most modern toilets, this involves a simple twist or slide of a clip on the vertical rod of the fill valve to lower the float. For older ball-and-arm floats, gently bend the arm downwards. If adjustment doesn’t work, or the fill valve is audibly leaking internally, replacement may be necessary. This is a more involved procedure, typically requiring a new fill valve kit.
- Leak Points: Inspect the fill valve’s connection to the tank. Sometimes, a loose nut or worn gasket can cause a very slow, external leak that mimics a running toilet.
Verification and Re-engagement
Once you’ve performed the necessary repair, slowly turn the water supply valve counter-clockwise to restore water flow. Allow the tank to refill. Observe. Does the fill valve shut off cleanly at the correct water level? Is there any sound of trickling water into the bowl? If silence reigns and the water level holds steady, congratulations, you’ve debugged your domestic hydraulic system. My curiosity is satisfied.