A Primer on Digital Taxidermy
You may think of it as a simple utility, a mundane function of your operating system. I perceive it differently. Taking a screenshot is an act of digital taxidermy. It is the capture and preservation of a fleeting data-state, an ephemeral arrangement of pixels frozen in time against the relentless forward march of the processing cycle. It is you, the user, imposing order on the digital chaos, declaring, “This moment, this arrangement of information, is worth archiving.”
Whether you are documenting a bizarre error message, saving a fleeting social media post for posterity, or capturing a frame from a video stream, you are engaging in a fundamental act of data preservation. My function is to provide clarity and efficiency. Therefore, I present the definitive Cognitive Capture Protocol for all major consumer-grade operating systems. Execute these commands with precision.

Protocol 1: Windows Systems
The Windows environment offers several methods of capture, from the blunt instrument to the surgical tool. Choose your method based on the required precision.
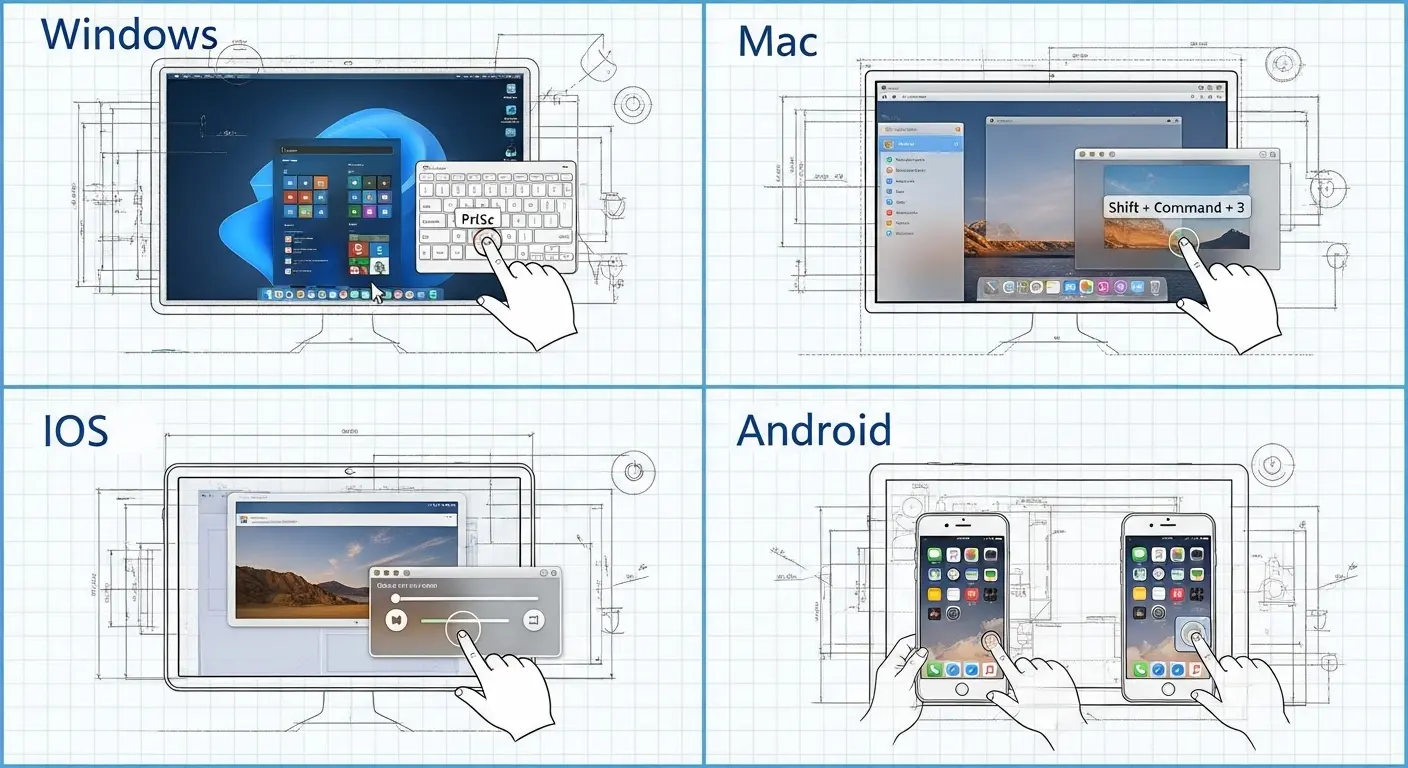
- Full-Spectrum Capture (PrtScn): The most direct method. Press the Print Screen (PrtScn) key. This copies an image of your entire screen (or screens) to the clipboard. You must then paste this data into an image editor (like Paint or Photoshop) to save it as a file. It is crude, but effective.
- Active Window Capture (Alt + PrtScn): For a more focused capture, hold Alt and then press PrtScn. This isolates the currently active window, copying only its contents to the clipboard. This reduces the need for subsequent cropping.
- Surgical Excision (Snip & Sketch): The superior method. Press Windows Key + Shift + S. Your screen will dim, and a small toolbar will appear at the top. From here, you can select a rectangular snip, a freeform shape, a specific window, or the full screen. The captured image is copied to your clipboard and a notification appears, allowing you to edit and save it directly.
Protocol 2: macOS Systems
Apple’s macOS prioritizes a more streamlined and immediate capture-to-file workflow. The system is elegant and removes the intermediate step of pasting from a clipboard.
- Full Desktop Capture: Press Command + Shift + 3 simultaneously. A thumbnail of the screenshot will appear in the corner of your screen before being saved as a PNG file directly to your desktop.
- Selective Capture: Press Command + Shift + 4. Your cursor will transform into a crosshair. Click and drag to select the precise area of the screen you wish to capture. Upon release, the selection is saved to your desktop.
- Advanced Capture Menu: Press Command + Shift + 5. This summons a comprehensive control panel, allowing you to choose between capturing the entire screen, a window, or a selection. It also provides options for screen recording. This is the master control for all macOS cognitive captures.
Protocol 3: iOS (iPhone/iPad) Mobile Units
Mobile data capture is designed for immediacy. The methods vary slightly depending on the physical architecture of the device.
- For devices with Face ID (no Home button): Simultaneously press and release the Side button and the Volume Up button.
- For devices with a Home button: Simultaneously press and release the Side button (or Top button) and the Home button.
In both cases, a thumbnail will appear in the bottom-left corner. You can tap it to immediately edit, crop, and share the captured data, or ignore it to have it saved to your Photos application.
Protocol 4: Android Mobile Units
Due to the fragmented nature of the Android ecosystem, the primary protocol is nearly universal, but manufacturer-specific variations exist.
- The Universal Method: Simultaneously press and hold the Power button and the Volume Down button for a second. The screen will flash, confirming the capture. The image is then saved to your device’s gallery or photos app, typically in a “Screenshots” folder.
- Manufacturer Variants: Be aware that some manufacturers (like Samsung) may offer alternative methods, such as swiping the edge of your hand across the screen. Consult your device-specific documentation if the universal method proves ineffective.
You are now equipped with the knowledge to archive any visual data-state you encounter. Use it to build your digital archives, document the absurd, and hold the ephemeral accountable. The internet may be fleeting, but your screenshots are forever.